In this article, we will learn about image pyramids and how to implement them in Python using OpenCV.
What are Image Pyramids?
Image pyramids are a commonly used technique in computer vision and image processing that involves creating a multi-scale representation of an image.
This representation consists of a series of progressively downsampled images, where each level of the pyramid represents the original image at a different scale.

Image pyramids are a commonly used technique in object detection because they allow for the detection of objects at different scales or sizes.
In object detection, we often use a machine learning algorithm to classify objects in an image.
For example, we can train a classifier on a set of predefined features, and then use that classifier to detect objects in the image.
However, a major challenge in object detection is that objects can appear in an image at different sizes, and if we search for objects at one fixed size, we may miss some of them.
To address this challenge, we can use image pyramids to represent the image at different scales. We then apply the classifier to each level of the pyramid to detect objects.
Building an Image Pyramid in OpenCV
In OpenCV, we can build an image pyramid using the cv2.pyrDown() function.
The cv2.pyrDown() function takes an image as input and returns a downsampled version of the image. By repeatedly applying this function to an image, we can create a pyramid of the image at different scales, where each level is a downsampled version of the previous level.
Let’s see how we can use the cv2.pyrDown() function to create an image pyramid.
import cv2

# Load the image
image = cv2.imread("1.jpg")

# Create a list with the original image as the first element
gaussian_pyramid = [image]

# Generate 5 pyramid levels using PyrDown
for i in range(5):
    image = cv2.pyrDown(image)
    gaussian_pyramid.append(image)

# Display the pyramid images
for (i, resized) in enumerate(gaussian_pyramid):
    cv2.imshow(f"Gaussian Pyramid Level {i + 1}", resized)
cv2.waitKey(0)
cv2.destroyAllWindows()
So here we first load the image and create a list with the original image as the first element. Then we use a for loop to apply the cv2.pyrDown() function to the image 5 times, and each time we append the downsampled image to the list.
When downsampled, the image is blurred (using a Gaussian smoothing filter) to remove some of the high-frequency content in the image. This helps to reduce the likelihood of aliasing, which can help preserve more of the important image details during the subsampling process.
Finally, we use another for loop to display the images in the list.
The output of the above code is shown below.
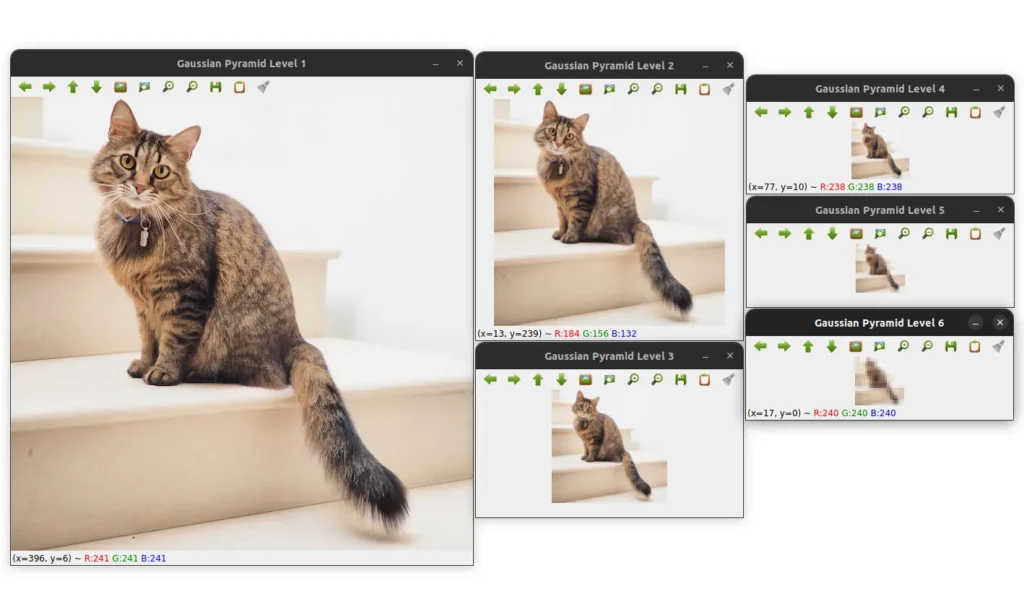
We can see that the image is progressively downsampled as we go up the pyramid.
We can rewrite the above code to make it more flexible. We can create a function that takes an image, a scale factor, and the minimum image size as input, and returns a list of images at different scales.
Here is the code for the function.
def pyramid(image, scale=1.5, min_size=(40, 40)):
    yield image

    # Generate pyramid levels until minimum size is reached
    while True:
        # Calculate the new image size based on
        # the scale factor and resize the image
        w = int(image.shape[1] / scale)
        h = int(image.shape[0] / scale)
        image = cv2.resize(image, (w, h))
The function takes an image, a scale factor, and the minimum image size as input. It then yields the original image and enters a while loop that runs until the image size is less than the minimum size.
Inside the while loop, we calculate the new image size based on the scale factor and resize the image.
We then yield the resized image and continue the loop.
        # If the new level is too small, stop generating more levels
        if image.shape[0] < min_size[1] or image.shape[1] < min_size[0]:
            break

        # Yield the next image in the pyramid
        yield image
We can then use the pyramid() function to create an image pyramid.
for (i, resized) in enumerate(pyramid(image)):
    cv2.imshow("Layer {}".format(i + 1), resized)
    cv2.waitKey(0)
The output of the above code is the same as the output of the previous code. But this time the image is downsampled with a scale factor of 1.5.
I personally prefer the second approach because it is more flexible and can be used to create image pyramids with different scale factors and minimum image sizes.
This is especially useful when you want to create your own object detector.
You can use the pyramid() function to create an image pyramid of the image you want to detect objects in, and then apply your classifier to each level of the pyramid to detect objects at different scales.
I have shown the output below for reference.
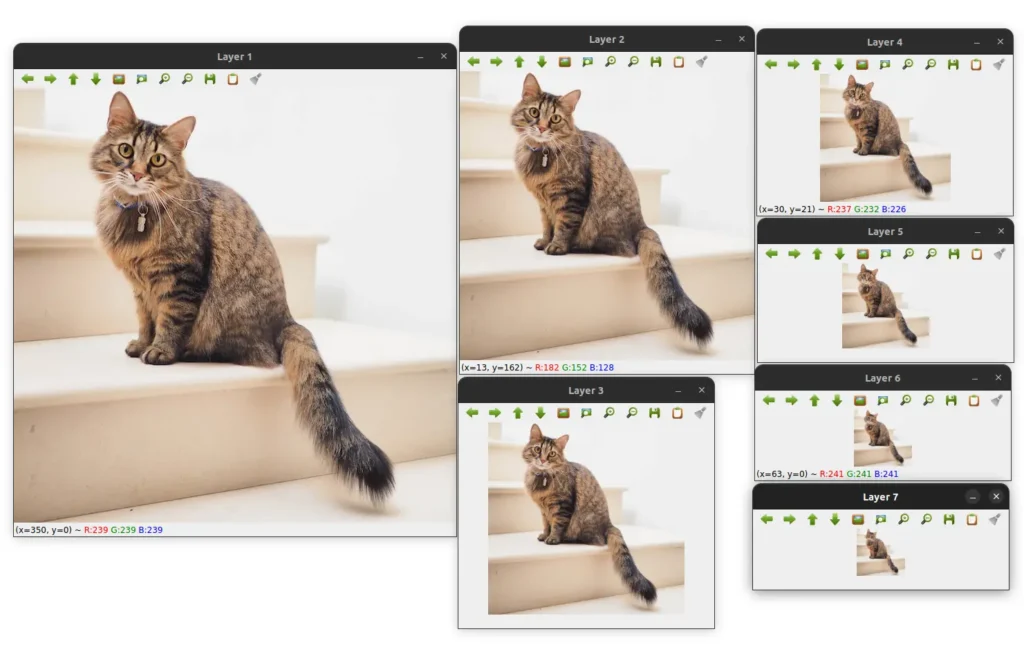
As you can see, using a scale factor of 1.5, we get 7 levels in the pyramid. The first level is the original image, and the last level is the smallest image in the pyramid.
Summary
In this article, we learned about image pyramids and how to implement them in Python using OpenCV.
We learned that image pyramids are a commonly used technique in computer vision and image processing that involves creating a multi-scale representation of an image.
We also learned that image pyramids are a commonly used technique in object detection because they allow for the detection of objects at different scales or sizes.